Stepping into the World of Radon Mitigation Systems
Have you ever heard of radon? It’s a sneaky gas that you can’t see or smell, but it can sneak into our homes and cause health problems. But don’t worry! At Peerless Environmental LLC, we have ways to fight back. In this article, we’ll talk about the best radon mitigation systems that can help keep your home radon-free.
💡 Dive into this informative guide because it equips you with essential knowledge against radon’s hidden dangers, showcasing the best mitigation strategies.
NOTABLE INSIGHTS:
- Radon’s Harmfulness: Radon is a colorless, odorless gas that can cause lung cancer. It enters homes through foundation cracks.
- Mitigation Systems: Radon mitigation systems are used to redirect radon gas away from homes, reducing its levels.
- Types of Systems: The four main types of radon mitigation systems are Sub-Slab Depressurization, Drain Tile Depressurization, Block Wall Depressurization, and Sub-Membrane Depressurization.
- Professional Installation: It’s recommended to have a professional install the mitigation system to ensure effectiveness.
- Regular Testing: Homes should be tested for radon every two years, and newly installed systems should be checked after 90 days.
- Cost: The average cost of a radon mitigation system ranges between $800 and $1500.
Getting to Know Radon and Why It’s a Problem
Before we talk about the solutions, let’s understand the problem. Radon is a gas that comes from the ground and can get into our homes. It’s not something we can see, smell, or taste, but it’s there, and it can be harmful.
How Does Radon Get Inside Our Homes?
 Radon comes from the ground and can sneak into our homes through tiny cracks in the foundation. Once it’s inside, it can get trapped and build up over time. It doesn’t matter if your home is old or new, radon can still get in.
Why Should We Be Concerned About Radon?
Radon is harmful because it can cause lung cancer. It’s actually the second leading cause of lung cancer, right after smoking. It’s believed that radon causes thousands of deaths each year.
The Top 4 Residential Radon Mitigation Systems
Now that we know why radon is a problem, let’s talk about the solutions. Here are the top 4 residential mitigation systems that can help keep your home safe from radon. These systems are designed to redirect harmful radon gas away from your home.
Sub-Slab Depressurization Systems (SSD)
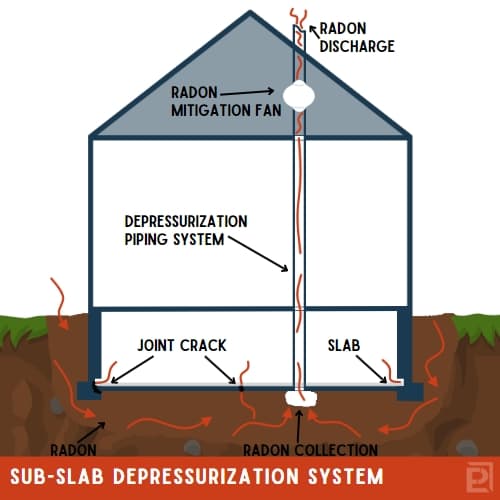
The Sub-Slab Depressurization (SSD) system is a popular and reliable way to reduce radon. This type of system is commonly used in homes with a basement or slab-on-grade foundation. It’s designed to address the radon at its entry point – the ground beneath your home.
How Does an SSD System Work?
The SSD system works much like a vacuum cleaner, but instead of dust, it’s sucking up radon gas. Here’s how it works: a hole is drilled into the concrete slab of your home’s foundation. A PVC pipe is then inserted into this hole, extending up through the house and out the roof. At the top of this pipe, a special fan is installed. This fan creates a vacuum effect, sucking up the radon gas from beneath the slab and expelling it safely above the roofline, where it quickly dilutes and becomes harmless.
This process effectively intercepts the radon before it has a chance to enter your home, keeping your indoor air clean and safe.

Installing and Using SSD Systems
When it comes to installing an SSD system, it’s best to leave it to the professionals. This isn’t just a matter of convenience—it’s about safety. Radon mitigation is a specialized field, and a poorly installed system might not only fail to reduce radon levels, it could even make the problem worse.
Professional radon mitigation contractors have the training and experience to install these systems correctly. They’ll also perform a follow-up test to ensure the system is working as it should. Once properly installed and maintained, an SSD system can reduce radon levels in your home by up to 99%, providing peace of mind that your home is safe from the dangers of radon gas.
Drain Tile Depressurization Systems (DTD)
Drain Tile Depressurization Systems, or DTD systems, are specifically designed for homes that already have a drain tile system in place. Drain tile systems are commonly installed in homes to manage water accumulation around the foundation, often working in conjunction with a sump pump to keep basements dry. But did you know they can also be a part of your radon mitigation strategy?
How Does a Drain Tile Depressurization System Work?
A DTD system works by capitalizing on the existing drain tile system. The drain tiles, which are essentially a network of pipes around your home’s foundation, can also serve as a pathway for radon gas to move.
The DTD system uses a fan to create a vacuum in the drain tile system. This vacuum effect sucks up the radon gas that has entered the drain tiles, preventing it from seeping into your home. Instead, the radon gas is safely vented outside, well above the roofline where it can disperse harmlessly into the atmosphere.
It’s important to note that the DTD system doesn’t interfere with the primary function of the drain tiles and your sump pump. They will still work to keep your basement dry by redirecting water away from your home’s foundation.

Installing and Using Drain Tile Depressurization Systems
Installing a DTD system requires professional expertise. It involves connecting a vent pipe to the drain tile system and installing a specialized fan to create the necessary vacuum. The vent pipe is then extended upwards, usually on the exterior of the house, to safely release the radon gas outside.
Once installed, a DTD system can significantly reduce the radon levels in your home, making it a safer place for you and your family. Regular maintenance checks are recommended to ensure the system continues to operate effectively.
Block Wall Depressurization Systems (BWD)
Block Wall Depressurization Systems, or BWD for short, are specifically designed for homes with hollow block foundation walls. These types of foundations are common in many older homes and can pose a unique challenge when it comes to radon mitigation.
How Does a Block Wall Depressurization System Work?
The BWD system operates on a simple yet effective principle. Radon gas, which enters the home through the soil and rock beneath the foundation, can accumulate in the hollow spaces within the block wall foundation. The BWD system works by creating a vacuum within these hollow spaces.
A hole is drilled into the block wall, and a pipe is inserted. This pipe is connected to a fan that creates suction, pulling the radon gas from the hollow spaces in the block wall. The radon gas is then safely vented outside the home, preventing it from entering the living spaces.

Installing and Using Block Wall Depressurization Systems
Installation of a BWD system should be done by professionals due to the complexity of the task. Once installed, the system runs continuously, effectively reducing radon levels in homes with block wall foundations. Regular maintenance checks are recommended.
Sub-Membrane Depressurization Systems (SMD)
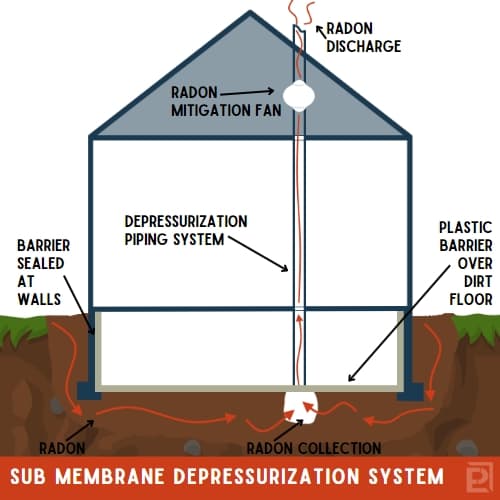
Sub-Membrane Depressurization Systems, or SMDs, are a specific type of radon mitigation system designed for homes with crawl spaces. Crawl spaces can be particularly susceptible to radon accumulation due to their close proximity to the ground and often poor ventilation.
How Does a Sub-Membrane Depressurization System Work?
The SMD system works by creating a physical barrier between the crawl space and the rest of the home. A durable, puncture-resistant plastic sheet is carefully placed over the entire floor of the crawl space. This sheet acts as a barrier, preventing radon gas from seeping up into the home.
But the system doesn’t stop there. A specialized fan is connected to a pipe that extends from the plastic-covered crawl space to the outside. This fan creates a vacuum effect, sucking up the radon gas trapped under the plastic sheet and safely venting it to the outdoors. This way, the radon gas is redirected before it has a chance to enter your home.

Installing and Using Sub-Membrane Depressurization Systems
Professional installation is crucial for an SMD system to ensure its effectiveness. Once set up, it can significantly lower radon levels in homes with crawl spaces. Regular checks are advised to maintain its performance and to ensure the system continues to protect your home from radon exposure effectively.
Radon Mitigation Systems FAQ:
What is the Most Effective Radon Mitigation System?
While all radon mitigation systems are designed to reduce radon levels, the Sub-Slab Depressurization (SSD) system is often considered the most effective. It can reduce radon levels by up to 99% when installed correctly.
How Effective are Radon Mitigation Systems?
When installed and maintained correctly, radon mitigation systems can be very effective. They can reduce radon levels by up to 99%.
Does Every Home Need a Radon Mitigation System?
Not every home needs a system. It’s important to test your home for radon to see if the levels are high enough to need one. If you are building a new home, consider building using radon-resistant construction methods.
How Often Should I Check for Radon?
You should check your home for radon at least every two years. If you’ve just installed a mitigation system, you should check 90 days after installation to make sure it’s working.
Can I Install a Radon Mitigation System Myself?
While you might be able to install a system yourself, it’s usually better to have professional radon mitigation system installers do it. This way, you can be sure it’s done right and will work properly.
How Much is a Radon Mitigation System?
Radon mitigation systems costs can vary, but on average, you can expect to pay between $800 and $1500.
Can Radon Mitigation Systems Stop Working?
Like any system, radon mitigation systems can stop working for various reasons, like if the fan breaks or if there are cracks in the system. Regular checks can help make sure your system is working properly.
Is One Radon Mitigation System Enough?
In most cases, one radon mitigation system is enough to reduce radon levels in a home. However, the specific needs can vary depending on the size and layout of the home, as well as the radon levels.
What are the Cons of a Radon Mitigation System?
The main downside of a radon mitigation system is the cost, which can range from $800 to $1500. Additionally, like any system, radon mitigation systems can stop working for various reasons, like if the fan breaks or if there are cracks in the system.
Should I Buy a House with Radon Mitigation System?
Absolutely! A house with a radon mitigation system is not a deal-breaker—in fact, it can be a good thing. It shows that the previous owners were proactive about radon safety and took steps to ensure the home’s indoor air quality.
However, it’s important to ensure that the system is working properly. You should ask when it was installed, who installed it, and when it was last serviced. It’s also a good idea to conduct a radon test to confirm that the system is effectively reducing the radon levels in the home.
Remember, radon is a common issue that can be managed effectively with the right system. So, don’t let the presence of a radon mitigation system deter you from buying a house you love.
Navigating Home Purchases and Power Outages
When considering buying a new home, radon levels can be a deal-breaker. It’s crucial to get a radon test done, and if the levels are high, a mitigation system can be a lifesaver. Some sellers might even offer a credit to install a system, making it a less daunting investment.
But what about power outages? A common concern is the system’s functionality during a power cut. It’s essential to have a backup power source to keep the system running 24/7. This ensures that your home remains radon-free, even when the lights go out.
By addressing these two critical points, you’re not just installing a system; you’re investing in peace of mind.
Final Thoughts: Choosing the Best Radon Mitigation System for Your Home
Radon might be a sneaky gas, but we have ways to fight back. The top 4 radon mitigation systems—Sub-Slab Depressurization, Drain Tile Depressurization, Block Wall Depressurization, and Sub-Membrane Depressurization—can help keep your home safe.
Remember, it’s best to have a professional install these systems and do regular checks to make sure they’re working properly. So, if you’re looking for “radon mitigation systems near me”, make sure to choose a reputable installer like Peerless Environmental LLC.
Protect Your Home with Radon Mitigation Systems
Understanding the dangers of radon is essential, but it’s even more critical to take steps to protect your home and health right now. If you’re concerned about the presence of radon in your home, don’t delay. Reach out to our team of experts at Peerless Environmental LLC today for a thorough radon inspection and mitigation service. We’re dedicated to ensuring your home is safe, healthy, and radon-free. Don’t leave it to chance—secure your family’s health today.
Like this article? Share it with your friends and family.
Last updated on February 27th, 2024 at 04:46 pm

